Showing posts with label crochet. Show all posts

Friday, July 1, 2011

Exciting news...

Many people have already seen it, but for those who haven't check out Ezcetera Magazine by Kim Archer and her talented team. It is full of great projects and pretty pictures - it definitely has Kim's gorgeous fresh signature style stamped all over it. The first issue is free, then subsequent issues will only be $4.50AU - what great value!

What makes this all just that little bit more exciting for me is that Lisa , from Kim's editorial team, contacted me a few weeks ago to ask if they could link to my African Flower tutorial in the mag. I was so thrilled to have a part, even a small one, in such an awesome project.

Above is the pic I sent to be included in the magazine.

Well the kettle has just boiled so I'm going to make a cup of tea to enjoy while I have a good read of Ezcetera Magazine. In the busyness of the morning, I've only had time for a quick flick through so far.

Monday, June 6, 2011

Star baby blanket

My friend, Ally, had her 3rd precious baby boy last week. As I mentioned in my earlier posts, I've started making a blanket for my little boy, but I decided to add to the squares I'd already done to make a baby blanket for Ally's new baby.


I used a pattern from Issue 25 of The Art of Crochet .It was pretty easy to make. I'm surprised at how simple crochet is! Most patterns only consist of a handful of the same stitches, just in different combinations. I wish I had retaught myself how to do it when my children were babies - I would have loved to have had blankets like these for them. Actually I do have a few large granny square blankets that my mum made for them when they were babies, which I plan to hold onto forever :)

For the star blanket I used Lincraft Superwash Wool in blue, lime and cream. I used about 2.5 balls of each colour, which was enough to make all 36 squares, join them and add the border around the blanket.


I just love these colours together - so... well so boyish! Time to restock so I can start on my son's blanket. His is going to be a little different. For starters, MUCH bigger as he is almost 8yrs old! The stars are only going to be an accent on his and there will be a few more colours - red, a couple of different shades/tones of blue, stone/beige... I can't wait to get started on it. But it will have to wait just a little longer. First I need to get through a week of prac teaching this week for uni (one day down, four more to go), as well as write a 2500 word essay due next week! Bring on uni holidays :)

Sunday, June 5, 2011

African flower

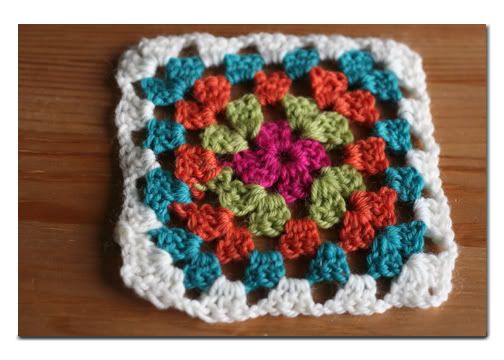
I have been admiring this gorgeous flower pattern for a few months now. But until last night I hadn't attempted it because I thought it would be a bit tricky plus I wanted to finish my other projects first. Well they are super easy - if you can crochet a granny square you can do one of these. I've come across a couple of online tutorials and patterns and so I've kind of combined them so will share the way I've done them. I'll be using English/Australian terms as I haven't been able to find a tutorial for these that doesn't use American terms. You can find a tutorial with American terms here and the original pattern written in Afrikaans is found here .I hope my instructions are easy to follow. If you need further help, just add your question in the comments section.

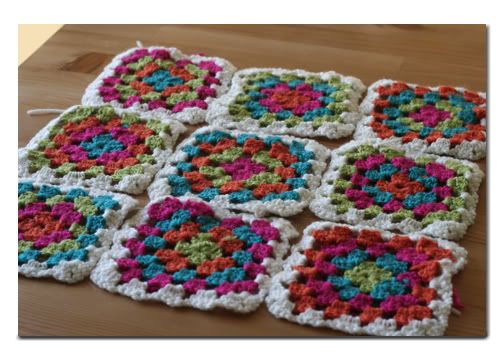
Pictured below are three finished African Flower Hexagons. I prefer the one at the top where the two rows that make up the petals are the same colour. But to make it easier to see each row,  I'll be showing a step by step of one of the flowers using a different colour for each row. Excuse the quality of the pictures - I used my iPhone to take them all and haven't edited them at all.


I have used a variety of 8ply wool that I have in my stash and a 4.5mm hook
With your first colour, start with 5ch, then join with a slipstitch to form a ring.

First row: ch 3 (which will count as your first treble {tr}), 1 tr, 1 ch into the ring (2 tr, 1 ch) 5 times until you have 6 x 2 tr clusters (as pictured below). Join with a slipstitch through the top of your first ch3.


Row 2: Join 2nd colour in any of the ch1 spaces. Then ch3 (counts as first tr), tr 1, ch 1, tr 2 all into the chain space where you joined. Continue around (tr 2, ch 1, tr 2) in each chain space.
At the end of the round join with a slip stitch to the top of your first ch 3. Fasten off if you are changing colours for the next round, but you can continue with this same colour if you wish.

Round 3: join 3rd colour (if changing colour for this round) into any chain space.

Rnd 3 cont: ch3 (counts as first tr) and tr 6 all into the same chain space. Then tr 7 into each of the 5 remaining chain spaces.

Join with a slip stitch into the top of your first chain 3 and fasten off. You will want to choose another colour for the next round as it helps to define the flower petals.


Round 4: join next colour. Ch 2 (counts as first double crochet (dc) ),dc into each tr stitch from previous round. When you get to the space between the petals, treble right down through to the space in the second (light pink) round. You will end up with a long stitch, but this is what defines the petals. I've tried to show how this is done in pictures below.

So to do this treble stitch, as usual, yarn over hook but instead of inserting hook into the space in the dark pink round, insert it into the space in the light pink round. Then yarn over hook, bring it back through, yarn over hook and bring it through the first 2 loops on hook, yarn over again and bring it through the final 2 loops on the hook. Hope that makes sense! It really is just like doing a normal treble stitch.


Above - bring the hook back through and yarn over, ready to bring it through the first 2 loops on hook.

Above - the completed treble stitch. Continue around with a dc in each tr, and a tr between each petal as shown.

Join with a slip stitch into the top of the first ch 2 and fasten off.


Round 5: Join final colour and ch 3 (counts as first tr), tr into each dc. When you reach the centre stitch of each petal, (tr1, ch 1, tr1) all into the same stitch then continue with 1 tr into each stitch. This helps to form the hexagon shape. The (tr1, ch 1, tr1) into one space is also known as a V-stitch.

Above - first v-stitch.

Above - second v-stitch. In between each of the v-stitches I ended up with about 7 trebles I think. Continue this pattern all the way around.


When you reach the end, join with a slipstitch into the top of your first ch3. You can fasten off here, or add another border round if you wish - in either the same colour or a contrasting one.

I hope my instructions are all clear. Please feel free to ask any questions by commenting on this post and I will do my best to clarify. I love these flowers - I can't wait to get started on another blanket now! There goes my self-imposed rule to only work on one project at a time!

Saturday, June 4, 2011

Newborn set

I made this set for a friend Ally's  new little baby boy. It was pretty quick to whip up - it only took an afternoon & a night to do. I used Bendigo Luxury 8ply in Koala . I only needed one ball (200g) and still have about a third of it left over. I love the natural colour for a new little baby boy! I love Bendigo wool - such great value! Next time I'm visiting family in Echuca I'll be making a trip down to the Bendigo warehouse :)


I made up the pattern for the beanie off the top of my head as I went. How gorgeous are the little booties. You can find the pattern for those here .They were super quick and easy to make, I did need to look up youtube to figure out one of the stitches I hadn't done before.
The pattern for this cute little cardigan can be found here .I was a bit apprehensive about making a cardigan, but it really wasn't that hard using this pattern. I did need to use a larger hook than the pattern called for (I used a 6mm). I love that it's made all in one piece - apart from the collar which is done at the end, but joined on as you crochet it. If you've only ever made granny squares, but want to try something a little more challenging, give this pattern a try. You might surprise yourself like I did!

I'm excited to be starting a new project for my almost 8yr old. The star squares from a couple of posts ago are the first part. But there is a lot more to it than just those. I'll share more about that soon! I'm flat out finishing assignments as it is the end of semester at uni. I can't wait to have a bit of breathing space from the end of next week and get back into some serious (fun!) crafting :)

Saturday, May 28, 2011

Apple Jacket

How cute is this? I made it last night from a pattern I found from a new craft magazine - Mollie Makes which isn't available in Australia yet. I think it comes out June 9. There is a link at the top of the Mollie Makes site with sample pages from issue one where you can find the pattern for this :) I can't wait for the mag to arrive here. After Notebook magazine finished up a few months ago, I haven't found anything else that compares. Mollie Makes looks great though!

Sunday, May 1, 2011

Start & finish...

I'm STILL going on the granny square blanket. It's almost finished. Joining the squares is becoming quite tedious so I am only doing one row at a time - and not very often! I've joined all the vertical rows and half of the horizontals - so it's nearly there. I just wish I had more hours in the day - don't we all? We're just finishing 2 weeks of school & uni holidays today and I thought I would have had some nice cold wet autumn days to sit inside and happily crochet away. But we've had almost 2 full weeks of glorious warm sunny days. I'm not complaining at all - it was nice to be able to spend lots of time doing outside things :)


Here is another reason I've been a little slow to finish the granny blanket! I've learned not to have more than one big project on the go. But when I came across the pattern for these star granny squares I couldn't wait to give them a try. I found the pattern in The Art of Crochet. I'm really happy with how they are turning out. They are quite easy to do too.


Back to uni for me tomorrow which means a busy couple of months ahead. Hopefully I'll be able to squeeze in a bit a creative time every now and then!

Sunday, March 6, 2011

On the home stretch...

 I've finished all the squares for this blanket and have started joining them. I wasn't quite sure how I was going to join them so I googled "how to join granny squares" and the first link that came up was for one of my favourite crochet blogs - Attic 24. Lucy's instructions are so clear and easy to understand, so that's the way I'm joining all 96 of my little granny squares. Lucy's technique gives a nice neat finish. I'm joining them all in rows vertically - on the picture below the first to rows on the right have been joined. So I'll continue along each vertical join, then do all the horizontals. Lastly I'll need to add a border and an edge. I'm thinking of doing another couple of rows of white treble clusters (is that what they're called?) for the border and then a scalloped edge (also in white). I don't really want to add any more colour. Any other suggestions?
Here are the squares all laid out. I tried not to agonise too much over the placement - which is not easy for me! I didn't want to repeat the same rows and I also tried to make sure I didn't have too much of one colour clustered together. So this is it - I WILL NOT move the squares around anymore :) I'm so glad to have it finished. I don't love it as much as I originally did, mainly  because I have found so many colour combinations (and wool suppliers!) that I love more since getting back into crochet & knitting. But I have loved the process. It's so nice to sit and crochet when I'm stressed - I've realised that maybe I should use a larger size hook when I'm stressed though as it shows the tension of my crochet haha! So I can't wait to start my next blanket - so many colour combinations and patterns to choose from, but I'm thinking a boyish blanket is in order and I already have a plan for it. I will be finishing this one before I start another one though - I've always been great at starting things but moving onto another more exciting project before the previous one is finished. I don't want all the hours that have gone into this project wasted - each square took me around 20-30 minutes to do, so that's a LOT of hours! As you can see, I have a lot of loose ends to work in too - ugh! Next time I'll try to do them as I go - not looking forward to such a tedious job, but it has to be done :(

So I'll be back soon with a finished blanket to show - and some better pics. I've been using my iPhone to take most of my photos lately (like the ones in this post) because it's so much more convenient than my DSLR and sometimes convenience wins out over quality :)

Sunday, August 22, 2010

Been busy making beanies...

... see? :) I've had lots of people asking me to make one (or a few) for them or their children - which makes me so happy!
I'm not entirely happy with my first attempt at earflaps... I have worked out a new way of doing them - which is great as I am working on two for an order right now!

I'll be back during the week with something exciting... Stay tuned :)

Sunday, August 1, 2010

Slow & steady...

This blanket is taking a LOT longer than I thought it would. I planned to have finished it by now. With only 4 weeks left of winter (YAY!!!), it's not looking like I will have it finished before the weather starts getting warm. Since I've started crocheting lots of other smaller projects (beanies, scarves etc) this blanket has kind of been put on the backburner apart from random bursts of motivation I get when I'm able to churn out a few squares.

So here is my progress so far (apart from a few more squares that I forgot to get out of my crochet bag before taking the pic)...
I'm not sure how big it will end up now. But I need to at least double the current size. I've never been good at finishing big projects so I need to keep plodding along with this for as long as it takes. Can you tell my enthusiasm for it has waned a little since I first started lol. I think it's mainly because I've found so many other things I want to get started and I've also been looking at lots of new wool and different colour combinations. I don't really like the colours I chose for this one anymore. So I'd better get back to it and finish it ASAP before it becomes yet another unfinished project...

Friday, July 9, 2010

technicolour beanie

I made another beanie last night. I love how quick and easy they are to make. I need to find a few new patterns/variations to try now. I used some wool that I picked up at Big W a couple of weeks ago. It was really cheap, from memory only around $2 or $3. It's actually designed for felting, but it worked quite well for this beanie and was surprisingly easy to crochet with. I used about 1.5 balls - so pretty cheap for a wool beanie! The manufacturer is Sean Sheep and this particular wool is called Beulah. It comes in quite a few different shade combinations.

Thursday, July 8, 2010

getting there...

...with the blanket. I haven't crocheted for years and after looking at a few youtube granny square tutorials, I thought I had the right idea and winged it from there. I wasn't entirely happy with my first squares and couldn't quite work out why they didn't look very neat. Then I looked at an actual pattern and realised my mistake straight away. Between each group of treble stitches, I'd been doing 3 chains - you're only supposed to do 1!!! I'd done about 30 squares incorrectly so I'm now in the process of unraveling then redoing them - I wish I'd realised my error sooner. I only have 12 more to redo now :) So below are all the squares I've done so far - the 2 piles in the top left are the bad ones that I still need to redo. You can see the difference between those and the rest - they are so big and messy!!!

Here are my squares so far all stacked up. I'm finally feeling like I'm getting somewhere. Although this is only about a third of my orginal target - not sure I'll end up making it as big as I planned. (that ugly green wall in the background is another big project I need to get onto - repainting)

Here they all are laid out (minus the 12 still to be redone). I'm really happy with how it's turning out - nice and bright!

Monday, April 26, 2010

Crochet

**eta** 5 June 2010... When I started this new blog I was really busy, so I posted a few photos with every intention of writing about them. But it was in the middle of my first semester of uni so I had absolutely no time! So semester 1 is now over and I have a bit of breathing space - and hopefully some creative time :)

In my blog surfing travels over the past couple of years I've come across some gorgeous crochet blogs. I decided I'd love to take up crochet again. I remember making a granny square rug when I was about 8 years old, but I'd totally forgotten how to crochet - apart from chain stitch... Last year I attempted to start a granny square rug, but failed dismally. I couldn't find any tutorials on youtube, or anywhere else that didn't totally confuse me. Then... a few weeks ago I found this easy to follow tutorial on youtube . I couldn't wait to get started (even though it was mid semester) I went to Spotlight and was delighted to find some gorgeous wool in bright colours - on sale! I'm using Moda Vera 8 ply 100% wool in colours: 08 (white), 04 (pink), 34 (green), 37 (turquoise), 15 (orange). The colours in brackets aren't the real names, I'll need to find out what they are. Only the numbers are on the labels, so if you are looking for the same wool, it should be easy enough to identify.

Above is the first square I did. It took a while. But I've now sped up the process a little and it takes me about half and hour to complete one square - hoping I can get a little faster.

By the end of the first week I'd made all these (plus a couple of rejects).
If you're looking for some crochet inspiration have a look at attic24 , I came across this blog last year and it's the first one that inspired me to take up crochet again. Then I discovered Sarah London's blog and Retro Mummy These are just my faves, but there are many more. Their work is all so pretty and neat. I have a long way to go in perfecting my crochet, but I'm loving it...