Showing posts with label baking. Show all posts

Saturday, June 25, 2011

Chocolate Cheesecake Brownie Slice

 I can't remember where I found this recipe, but I'm sure it's from a magazine. It's another favourite in our house - there seems to be lots of favourites in the ever-growing "sweet" category of my recipe box :) This is much better the next day (or the day after that!) after it's been in the fridge - in fact I'm not too keen on it on the first day.

Chocolate Cheesecake Brownie Slice

Ingredients
Cheesecake mixture:
250g cream cheese (let it come to room temperature)
1/2 cup (115g) caster sugar
2 eggs
1 tsp vanilla extract
1/4 cup plain flour

Chocolate Brownie mixture:
180g dark chocolate, chopped
160g butter, cubed
3/4 cup (155g) brown sugar
3 eggs, whisked
3/4 cup (115g) plain flour

Method
Preheat oven to 170 o C. Line 16x26cm slice tin with baking paper.
For cheesecake mix:
  • Beat cream cheese and sugar with electric beaters until smooth then beat in eggs one at a time.
  • Add vanilla and flour and stir until combined
For brownie mix:
  • Melt chocolate and butter over a double boiler on a gentle heat. (Or gently melt using a microwave). Cool slightly.
  • Add sugar and eggs and mix well.
Spoon cheesecake and brownie mixes alternately into the prepared tin. Swirl mixes with a skewer - don't overdo this step or it will end up all mixed together.
Bake for 30-35 minutes. Set aside to cool completely before cutting into about 20 squares (or 10 slices if you are using for dessert).
Best eaten the next day after it's been in the fridge overnight. I don't know if it freezes well as it's never lasted long enough in our house to have to freeze it! It's really delicious served for dessert with some icecream and raspberry coulis. I've been thinking of even adding some raspberries to the mix before baking - next time!

Sunday, January 9, 2011

Hummingbird Slice

I can't remember where this recipe comes from, but it's become a fave in our house the past couple of years. I've made it so many times now I can almost do it without looking at the recipe card. It's a great recipe if you have a couple of ripe bananas that need to be used. In fact I think that's why I first tried baking it - I was getting a bit sick of banana bread. Never thought I'd be sick of banana bread! Actually, I'm not sure if I've posted my recipe for banana bread here. I will check the archives and add it if I haven't already :)

Anyway, onto Hummingbird Slice!

Ingredients
1 cup self raising flour
1/3 cup plain flour
1tsp ground cinnamon
3/4 cup firmly packed brown sugar
1/3 cup dessicated coconut
450g can crushed pineapple (unsweetened), drained
2 large ripe bananas, mashed
2 eggs
2/3 cup vegetable oil
1 tsp finely grated orange zest (substitute for lemon, lime or a combination if you prefer)


Icing:
125g cream cheese
1 - 1.5 cups icing sugar mixture
1 tsp finely grated orange zest (substitute for lemon or lime as above)
2 tbs freshly squeezed orange juice (or lemon, or lime)


Preheat oven to 180 degC/160 C with fan.
Grease and line a 26x 16cm slice pan.
Sift flours and cinnamon into a large bowl. Stir in sugar and coconut then drained pineapple, banana and combined eggs, oil and zest.
Pour mixture into prepared pan and bake for 40-45 minutes or until a skewer inserted into the centre comes out clean.
Cool for 15 minutes in the pan then turn out onto a rack to cool completely. Spread icing on cooled slice and cut into approx 20 pieces.
Optional - sprinkle some extra dessicated coconut (or shredded as I have used) over the iced slice.


Icing

Beat all ingredients together until smooth. Adjust sugar, juice and zest quantities to taste.

Voila!

Friday, December 3, 2010

Mini Christmas Puddings

I made these cute little puddings for my 5yr old's class party. They are so simple to make (mostly anyway). I was planning on covering them in milk chocolate before topping them with white chocolate & sprinkles - but quickly discovered it's not the kind of job to do when you're in a hurry! So I scrapped the milk chocolate and just topped them with white chocolate. I still think they look ok???

To start, bake a packet mix chocolate cake according to directions on the box (see - EASY!) I baked it in a 8x13" lamington tin - as you can see it was only just big enough. Let the cake cool completely...


 ...then crumble it into a large mixing bowl. I probably should have used a bigger bowl to avoid spillage. Next add a whole container of pre-mixed chocolate icing (I used Betty Crocker brand). And mix it through the cake crumbs until really well combined - it will be sticky & messy!

 Next roll the mix into balls (a little smaller than a golf ball) and lay them on a baking paper lined tray. I managed to make about 36 puddings from one cake + icing mixture. Put them in the freezer to set. The next step is where I had problems. About 4 hours later I took them out of the freezer and tried to coat them in melted chocolate, but they fell apart in the chocolate. So I transferred the uncoated balls to mini cupcake papers and decorated them with melted white chocolate and sprinkles. Voila!

They can also be made with fruit cake moistened with some orange juice (or something a bit more special) - I'd love to give them a try. But I thought chocolate would go down better with kids :)


I transported them to school in one of these tins. Aren't they gorgeous? I picked up the whole set of three for about $12 at IKEA a few weeks ago. They'd be great filled with cookies and chocolates for Christmas gifts I think... This set is looking quite gorgeous on display in my kitchen :)

Monday, October 4, 2010

Buttermilk Pancakes

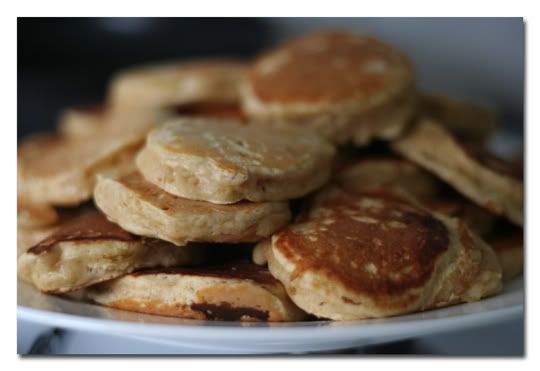
This is what we had for dinner tonight - yes pancakes for dinner! It's school holidays here at the moment + a public holiday today + the kids have done a great job the past few days spring cleaning their rooms, so I thought it would be nice to break the usual routine and have a treat. And it was GOOOOD!!! Tonight we had them with raspberries, blueberries, icecream and a drizzle of maple syrup. Normally when we have them for breakfast we have them with berries, sliced banana and maple syrup or occasionally bacon and maple syrup - don't knock it till you've tried it lol!


We always have pancakes for breakfast on special occasions - birthdays, mother's day, Christmas, and any other day we deem to be special :) I've tried lots of different pancake recipes over the years. A few tips and tricks I've learned and worked out when making pancakes are:
  • use a non stick pan if possible and don't grease it at all - it's the best way to get a nice even golden colour. I used to grease the pan with a little butter, but I found it made the outside cook too fast and it would burn while the inside was still gooey
  • cook them over a gentle heat (med-low) so they have time to cook through without the outside burning
  • leave the batter to rest for 5-10mins after mixing before you start cooking - this helps to get nice light and fluffy pancakes as opposed to rubbery ones
  • lastly, whatever recipe you use, substitute ordinary milk with buttermilk.

My favourite pancake recipe for the past few months has been from Julie Goodwin's first cookbook. I don't know what makes them taste so good, but I suspect it has something to do with using buttermilk instead of ordinary milk. It makes them so light and fluffy - YUM! I don't know all the ins and outs of buttermilk. But a few things I do know... despite the name it is actually low fat. It used to be a by-product of making butter. I guess the closet thing it could be compared to is plain yoghurt, it's kind of like a cultured or "soured" kind of milk. I'm not quite sure of the science behind it, but it is fantastic in baking. I think it has something to do with acid reacting with alkali... well let's just say it make things all light & fluffy and supermoist, VERY scientific and technical lol! I use it all the time in baking now in place of milk - in cakes, muffins, pikelets, scones - it does amazing things for scones. Give it a try next time you're baking, you won't be disappointed!

**edited to add** I just found a link to Julie's buttermilk pancake recipe here. This is exactly the same one as I use and it's the best I've tried :) Enjoy!

Wednesday, September 29, 2010

5 minute chocolate mug cake

I first came across this recipe a couple of years ago and it has become one of my favourite desserts, because it is so ridiculously quick and easy to make and it uses basic pantry ingredients. Tonight I decided to add some raspberries to the mix and I don't think I'll be able to eat it without them in future. The raspberries took it to a whole new level of delicious-ness :) It reminds me of the gorgeous chocolate coated raspberries that my lovely cousin has brought me, all the way from beautiful Tasmania. My only regret is that we didn't have any icecream to go with it! As the name suggests, it's intended for cooking in a mug. However, I find at least half of the mixture spills over and all over the microwave turntable when cooking. So I now use a 1 litre capacity pyrex dish to cook it in. The recipe easily serves 2 people.
In the photo below, the cake looks a little dry - I can assure you it wasn't :)
The recipe...
5 Minute Chocolate Mug Cake
4 tablespoons self raising flour
4 tablespoons sugar
2 tablespoons cocoa
1 egg
3 tablespoons milk
3 tablespoons melted butter (or oil if you prefer)
3 tablespoons chocolate chips (optional)
1/2 cup fresh or frozen raspberries (optional)
A small splash of vanilla extract


1 large coffee mug or microwave safe bowl
Add dry ingredients to mug, and mix well. Add the egg and mix thoroughly.
Pour in the milk and oil and mix well.
Add the chocolate chips and raspberries (if using) and vanilla extract, and mix again.
Put your mug in the microwave and cook for 3 minutes at 1000 watts (high). The cake will rise over the top of the mug, but don't be alarmed! Allow to cool a little, and tip out onto a plate if desired.

Tuesday, June 8, 2010

Apple Pikelets

You HAVE to make these pikelets!!! I based the recipe on one that I found in Donna Hay's Kid's Magazine. I've added a couple of things to her original recipe. I love Donna's recipes, they are so simple and easy to cook as well as always tasting great.

I remember cooking pikelets often when I was little. We just had plain ones in our house (with butter or jam & cream). I always loved them. But I think this new recipe with the addition of apple, cinnamon and brown sugar is going to be a new favourite in our house. They are so good! Perfect for an after school snack or a lunchbox treat. One thing I will try next time is to use a cup each of wholemeal and white SR flour.
Apple Pikelets
Ingredients (Makes about 30)

2 cups self raising flour
1 tsp ground cinnamon
1/3 cup firmly packed brown sugar
1 apple, grated (leave skin on)
3 eggs
30g butter, melted
1 cup milk
1 tsp vanilla
Extra melted butter for cooking.

Sift flour, cinnamon and sugar into a mixing bowl and make a well in the centre.
Add the rest of the ingredients, except apple, into the well and stir until combined.
Stir through grated apple.
Heat a non stick frypan over a low heat and melt a small amount of butter.
Drop heaped tablespoons of batter into the heated pan and cook for a couple of minutes, or until bubble appear on surface. Then flip and cook for another couple of minutes, until golden.
Serve warm or cold with your choice of vanilla yoghurt, jam, honey, butter and cinnamon sugar.
Enjoy!
Tips for making pikelets:
  • Don't over mix the batter or they will go rubbery. It's better to leave some small lumps than to overmix.
  • Cook in a non stick frypan if possible.
  • Don't let the pan get too hot or the pikelets will cook to quickly on the outside and still be raw in the middle.
  • Only use a small amount of butter in the pan. I have some melted butter in a small dish and use a pastry brush to "swish" a small amount around when the pan gets a little dry. Too much butter makes the outsides brown too much, too quickly.

Monday, April 26, 2010

Chocolate Freckle Slice

I made this slice today. The recipe is from AWW Easy Baking . Just searching for the book online now, I was surprised to find the RRP is $24.95, I paid about $8 for it at Sam's Warehouse a couple of month's ago - SCORE!!!

This recipe makes 35 sqaures - about 4x4cm each. It's only about 1cm deep, but it's VERY rich, kind of like a fudgy cookie. So one square, OK maybe two, are enough...

Chocolate Freckle Slice
185g butter, softened
220g jar chocolate hazelnut spread
1/3 cup (75g) firmly packed brown sugar
1 3/4 cups (250g) plain flour
200g packet freckles

Preheat oven to 160 deg C (140 C fan forced oven). Grease and line a 19x30cm lamington pan.
Beat butter, spread and sugar in a small bowl with an electric mixer until combined. Stir in sifted flour in two batches.
Press dough into pan, smooth surface with a spatula. Bake for 25 minutes.
Remove pan from oven and immediately press freckles firmly into slice in rows about 1.5cm apart. Cool slic in pan, cut when cold.
Makes 35 sqaures.

Hummingbird Slice

Recipe to follow...when I find where I wrote it down. This is why I need this blog - so I don't lose my recipes lol!