Friday, December 3, 2010

Mini Christmas Puddings

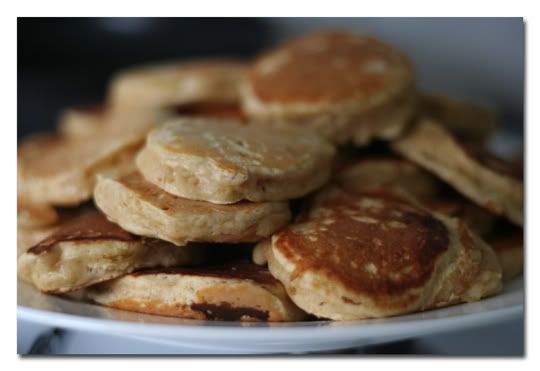
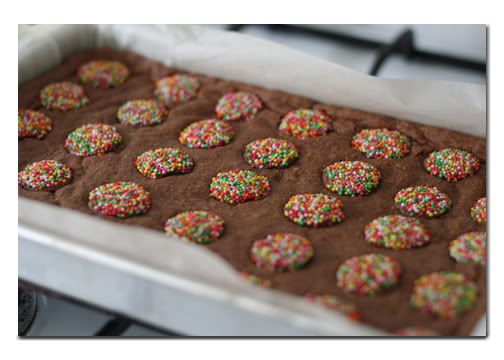
I made these cute little puddings for my 5yr old's class party. They are so simple to make (mostly anyway). I was planning on covering them in milk chocolate before topping them with white chocolate & sprinkles - but quickly discovered it's not the kind of job to do when you're in a hurry! So I scrapped the milk chocolate and just topped them with white chocolate. I still think they look ok???

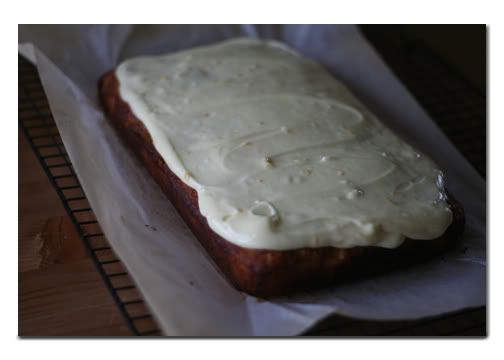
To start, bake a packet mix chocolate cake according to directions on the box (see - EASY!) I baked it in a 8x13" lamington tin - as you can see it was only just big enough. Let the cake cool completely...


 ...then crumble it into a large mixing bowl. I probably should have used a bigger bowl to avoid spillage. Next add a whole container of pre-mixed chocolate icing (I used Betty Crocker brand). And mix it through the cake crumbs until really well combined - it will be sticky & messy!

 Next roll the mix into balls (a little smaller than a golf ball) and lay them on a baking paper lined tray. I managed to make about 36 puddings from one cake + icing mixture. Put them in the freezer to set. The next step is where I had problems. About 4 hours later I took them out of the freezer and tried to coat them in melted chocolate, but they fell apart in the chocolate. So I transferred the uncoated balls to mini cupcake papers and decorated them with melted white chocolate and sprinkles. Voila!

They can also be made with fruit cake moistened with some orange juice (or something a bit more special) - I'd love to give them a try. But I thought chocolate would go down better with kids :)


I transported them to school in one of these tins. Aren't they gorgeous? I picked up the whole set of three for about $12 at IKEA a few weeks ago. They'd be great filled with cookies and chocolates for Christmas gifts I think... This set is looking quite gorgeous on display in my kitchen :)

Wednesday, December 1, 2010

Christmas

I say this every year - I can't believe the year is nearly over. The older I get, the faster the years seem to fly by.
I'm more organised for Christmas than I have been in a long time. As far as gifts go anyway... Decorating on the other hand is yet to be started! I love this time of year and can't wait to start decorating, wrapping presents (I LOVE wrapping presents), baking...

We did start watching some Christmas dvds and reading some books a couple of weeks ago. These are some of our favourites so far...
 This is a really nice cartoon which portrays the real story of Christmas. My children both love watching it. It's available here
We have several of Max Lucado's childrens books and dvds. This one teaches children that Christmas (or Maker Day as it's called in the story) is about giving rather than outdoing everyone else by getting the biggest and best presents. This one is available here 


I picked up this Veggie Tales dvd a couple of weeks ago - great value, 2 movies in 1. Our favourite is "The Toy That Saved Christmas". Available here 

This book is another recent purchase from here The illustrations are absolutely beautiful and the story is really well written and includes Bible references.
I'll hopefully be posting back regularly between now & Christmas with recipes and crafts that I'm making for Christmas.
(I realise a couple of the links are not working - I'll fix them ASAP. Blogger is being painful at the moment!)

Monday, October 4, 2010

Buttermilk Pancakes

This is what we had for dinner tonight - yes pancakes for dinner! It's school holidays here at the moment + a public holiday today + the kids have done a great job the past few days spring cleaning their rooms, so I thought it would be nice to break the usual routine and have a treat. And it was GOOOOD!!! Tonight we had them with raspberries, blueberries, icecream and a drizzle of maple syrup. Normally when we have them for breakfast we have them with berries, sliced banana and maple syrup or occasionally bacon and maple syrup - don't knock it till you've tried it lol!


We always have pancakes for breakfast on special occasions - birthdays, mother's day, Christmas, and any other day we deem to be special :) I've tried lots of different pancake recipes over the years. A few tips and tricks I've learned and worked out when making pancakes are:
  • use a non stick pan if possible and don't grease it at all - it's the best way to get a nice even golden colour. I used to grease the pan with a little butter, but I found it made the outside cook too fast and it would burn while the inside was still gooey
  • cook them over a gentle heat (med-low) so they have time to cook through without the outside burning
  • leave the batter to rest for 5-10mins after mixing before you start cooking - this helps to get nice light and fluffy pancakes as opposed to rubbery ones
  • lastly, whatever recipe you use, substitute ordinary milk with buttermilk.

My favourite pancake recipe for the past few months has been from Julie Goodwin's first cookbook. I don't know what makes them taste so good, but I suspect it has something to do with using buttermilk instead of ordinary milk. It makes them so light and fluffy - YUM! I don't know all the ins and outs of buttermilk. But a few things I do know... despite the name it is actually low fat. It used to be a by-product of making butter. I guess the closet thing it could be compared to is plain yoghurt, it's kind of like a cultured or "soured" kind of milk. I'm not quite sure of the science behind it, but it is fantastic in baking. I think it has something to do with acid reacting with alkali... well let's just say it make things all light & fluffy and supermoist, VERY scientific and technical lol! I use it all the time in baking now in place of milk - in cakes, muffins, pikelets, scones - it does amazing things for scones. Give it a try next time you're baking, you won't be disappointed!

**edited to add** I just found a link to Julie's buttermilk pancake recipe here. This is exactly the same one as I use and it's the best I've tried :) Enjoy!

Wednesday, September 29, 2010

5 minute chocolate mug cake

I first came across this recipe a couple of years ago and it has become one of my favourite desserts, because it is so ridiculously quick and easy to make and it uses basic pantry ingredients. Tonight I decided to add some raspberries to the mix and I don't think I'll be able to eat it without them in future. The raspberries took it to a whole new level of delicious-ness :) It reminds me of the gorgeous chocolate coated raspberries that my lovely cousin has brought me, all the way from beautiful Tasmania. My only regret is that we didn't have any icecream to go with it! As the name suggests, it's intended for cooking in a mug. However, I find at least half of the mixture spills over and all over the microwave turntable when cooking. So I now use a 1 litre capacity pyrex dish to cook it in. The recipe easily serves 2 people.
In the photo below, the cake looks a little dry - I can assure you it wasn't :)
The recipe...
5 Minute Chocolate Mug Cake
4 tablespoons self raising flour
4 tablespoons sugar
2 tablespoons cocoa
1 egg
3 tablespoons milk
3 tablespoons melted butter (or oil if you prefer)
3 tablespoons chocolate chips (optional)
1/2 cup fresh or frozen raspberries (optional)
A small splash of vanilla extract


1 large coffee mug or microwave safe bowl
Add dry ingredients to mug, and mix well. Add the egg and mix thoroughly.
Pour in the milk and oil and mix well.
Add the chocolate chips and raspberries (if using) and vanilla extract, and mix again.
Put your mug in the microwave and cook for 3 minutes at 1000 watts (high). The cake will rise over the top of the mug, but don't be alarmed! Allow to cool a little, and tip out onto a plate if desired.

Junkmail origami

It's school holidays here. Unfortunately we happen to be without a car for 3 weeks, 2 of those weeks being school holidays - AAAARGH!!! It actually hasn't been too bad, until today. Everyone started getting cabin fever. Anyone who knows me, knows I don't make quick decisions lol. Well today that all changed. After argument #547 this morning, almost without thinking I grabbed the pile of junk mail I'd pulled from the letterbox earlier and my big origami book and gave it to my 2 bickering wonderful children. I don't know why I hadn't thought of using junkmail for origami before - it saves them from taking all the paper out of my printer. I showed them how to fold the top edge diagonally across to the side edge and tear off the extra strip at the bottom with a ruler - to make a square. My 7 yr old made the boat (pictured above) and decided to test it out in the bathroom sink. The great thing about that is 1. he has lots of fun with it, 2. it gets all soggy and has to be thrown out - what a shame ;) I love keeping things my children make, but all mums with small children know you can only keep so much!

Sunday, August 22, 2010

Been busy making beanies...

... see? :) I've had lots of people asking me to make one (or a few) for them or their children - which makes me so happy!
I'm not entirely happy with my first attempt at earflaps... I have worked out a new way of doing them - which is great as I am working on two for an order right now!

I'll be back during the week with something exciting... Stay tuned :)

Sunday, August 1, 2010

Slow & steady...

This blanket is taking a LOT longer than I thought it would. I planned to have finished it by now. With only 4 weeks left of winter (YAY!!!), it's not looking like I will have it finished before the weather starts getting warm. Since I've started crocheting lots of other smaller projects (beanies, scarves etc) this blanket has kind of been put on the backburner apart from random bursts of motivation I get when I'm able to churn out a few squares.

So here is my progress so far (apart from a few more squares that I forgot to get out of my crochet bag before taking the pic)...
I'm not sure how big it will end up now. But I need to at least double the current size. I've never been good at finishing big projects so I need to keep plodding along with this for as long as it takes. Can you tell my enthusiasm for it has waned a little since I first started lol. I think it's mainly because I've found so many other things I want to get started and I've also been looking at lots of new wool and different colour combinations. I don't really like the colours I chose for this one anymore. So I'd better get back to it and finish it ASAP before it becomes yet another unfinished project...

Monday, July 12, 2010

shaggy ink caps

Nothing "crafty" in this post - unless of course I draw inspiration for a new beanie design called the shaggy ink cap ;p lol! I found these mushrooms (toadstools???) in the lawn this this morning. Last winter several of them appeared overnight out of nowhere. I did a bit of research to find out what they are and apparently they're called "Shaggy Ink Caps". They are also supposedly edible when young and still white. I'm not brave enough to eat them though! They end up opening and turning black - obviously where the "ink" part comes from. You can't really tell from the photos, but they are quite big - about 15-20cm tall!

frilly dilly bag

This is another "old" project. I made this bag about a year ago using Janelle Wind's Frilly Dilly Bag pattern.
Earlier this year I started making another of Janelle's bag patterns - Thelma's Day Out. But after starting uni, it kind of got pushed to the side. I really should finish it now that I'm having a break.

I love Janelle's work. Her patterns are gorgeous and really easy to follow. She has a new book out that I might buy as an early birthday present for myself :)

Sunday, July 11, 2010

Felt Folios

I made these a couple of years ago...back when I used to scrapbook a whole lot more than I do now. They were designed by Janelle Wind for an online class at Kim Archer's site . The folios are designed to fit a bunch of 6x4 photos in them. I'm thinking of making something similar for storing my growing collection of crochet hooks :)

old stuff...

I came across some old photos from my old blog that I thought I would post here before I delete the old one...

Friday, July 9, 2010

technicolour beanie

I made another beanie last night. I love how quick and easy they are to make. I need to find a few new patterns/variations to try now. I used some wool that I picked up at Big W a couple of weeks ago. It was really cheap, from memory only around $2 or $3. It's actually designed for felting, but it worked quite well for this beanie and was surprisingly easy to crochet with. I used about 1.5 balls - so pretty cheap for a wool beanie! The manufacturer is Sean Sheep and this particular wool is called Beulah. It comes in quite a few different shade combinations.

Thursday, July 8, 2010

getting there...

...with the blanket. I haven't crocheted for years and after looking at a few youtube granny square tutorials, I thought I had the right idea and winged it from there. I wasn't entirely happy with my first squares and couldn't quite work out why they didn't look very neat. Then I looked at an actual pattern and realised my mistake straight away. Between each group of treble stitches, I'd been doing 3 chains - you're only supposed to do 1!!! I'd done about 30 squares incorrectly so I'm now in the process of unraveling then redoing them - I wish I'd realised my error sooner. I only have 12 more to redo now :) So below are all the squares I've done so far - the 2 piles in the top left are the bad ones that I still need to redo. You can see the difference between those and the rest - they are so big and messy!!!

Here are my squares so far all stacked up. I'm finally feeling like I'm getting somewhere. Although this is only about a third of my orginal target - not sure I'll end up making it as big as I planned. (that ugly green wall in the background is another big project I need to get onto - repainting)

Here they all are laid out (minus the 12 still to be redone). I'm really happy with how it's turning out - nice and bright!

Sunday, June 27, 2010

Hooked

Corny title - I know lol ;P, but I really am hooked on crochet.  It's been great to pick it up again after not doing it for years - much to the detriment of my housework lol. I started this beanie last night and finished it off this afternoon. It's not such a great photo - it's actually a rich chocolate colour and the flower is dark pink & brown. The patterns for both the beanie and the flower are from Patons Learning To Crochet book that I think I bought from Big W last year. It's a great book for someone who doesn't know how to crochet - lots of easy to follow diagrams and instructions. I can see a new obssession starting! I have a pile of cardigans and jumpers that my daughter has grown out of that I'm planning to unravel to make some more beanies :) I've been making great progress with my granny squares too - the upside to being unwell and stuck on the lounge for a couple of days. I've done about 25 squares now. I'm not sure howmany I'll end up with, I originally planned to make a blanket 10 x 15 squares, but not sure if I'll get that far. Partly as I don't know if I'll have quite enough wool, and partly because I forgot how time consuming it is and I have so many other projects I want to start and I'd like to get this one finished. So it may end up just being a knee rug... time will tell :)

Tuesday, June 8, 2010

Apple Pikelets

You HAVE to make these pikelets!!! I based the recipe on one that I found in Donna Hay's Kid's Magazine. I've added a couple of things to her original recipe. I love Donna's recipes, they are so simple and easy to cook as well as always tasting great.

I remember cooking pikelets often when I was little. We just had plain ones in our house (with butter or jam & cream). I always loved them. But I think this new recipe with the addition of apple, cinnamon and brown sugar is going to be a new favourite in our house. They are so good! Perfect for an after school snack or a lunchbox treat. One thing I will try next time is to use a cup each of wholemeal and white SR flour.
Apple Pikelets
Ingredients (Makes about 30)

2 cups self raising flour
1 tsp ground cinnamon
1/3 cup firmly packed brown sugar
1 apple, grated (leave skin on)
3 eggs
30g butter, melted
1 cup milk
1 tsp vanilla
Extra melted butter for cooking.

Sift flour, cinnamon and sugar into a mixing bowl and make a well in the centre.
Add the rest of the ingredients, except apple, into the well and stir until combined.
Stir through grated apple.
Heat a non stick frypan over a low heat and melt a small amount of butter.
Drop heaped tablespoons of batter into the heated pan and cook for a couple of minutes, or until bubble appear on surface. Then flip and cook for another couple of minutes, until golden.
Serve warm or cold with your choice of vanilla yoghurt, jam, honey, butter and cinnamon sugar.
Enjoy!
Tips for making pikelets:
  • Don't over mix the batter or they will go rubbery. It's better to leave some small lumps than to overmix.
  • Cook in a non stick frypan if possible.
  • Don't let the pan get too hot or the pikelets will cook to quickly on the outside and still be raw in the middle.
  • Only use a small amount of butter in the pan. I have some melted butter in a small dish and use a pastry brush to "swish" a small amount around when the pan gets a little dry. Too much butter makes the outsides brown too much, too quickly.

Saturday, June 5, 2010

Finished "quilt"

I managed to finish my quilt for uni just in time (please excuse the black corners on the photo, I had to crop & rotate it). It's not really finished seeing as I didn't end up having time to quilt it - it was finished enough though. After the stress of finishing it way to close to the deadline, I was really happy when my teacher commented on how neat my stitching was. As nice as it is to get encouragement from friends who sew, it's really nice to get positive feedback from those who don't sew (especially those who will be grading me on it lol) - kwim?
The assignment was about gardening and we were asked to choose one plant and choose an audience (I chose pre-school aged children) and tell them at least one thing about the plant. We could choose to make whatever we wanted so I decided on a quilt to show how a tomato grows from a seed.There was a lot more I was going to add, but there are only so many hours in a day so I had to downsize my original idea. But as I said, the finished product serves its purpose.

Time for a break from uni now which hopefully means I can get back to some crochet, knitting, baking, sewing... just for me (and my family) with no deadlines! Looking forward to some downtime :)

Saturday, May 29, 2010

Busy, busy...

I've been incredibly busy since making the coat hangers from my last post. This is the last week of Semester 1 at uni, so I have a stack of assignments due and not much time for anything else. Thankfully - one of my assignments is fun :) I'm making a quilt with lots of applique. The idea is that it shows the process of growing tomatoes from seed. This is just a sneak peak...I'll come back and upload the finished product after Tuesday, when it's due... I can see a few late nights coming up this week!!!

Sunday, May 2, 2010

Covered coat hangers...

I love covered coat hangers (or hang coaters as my children have always called them lol). But I have to admit I'm not too keen on the "granny-type" knitted lace covered ones. They're great for hanging your clothes on, I just don't like the look of them. Anyway with the Mother's Day stall coming up at school, I thought they'd make great gifts. But I wanted to give them a cuter, more modern look. So I decided to try covering them in fabric. I found an online tutorial here . I cut mine out the same way except my fabric needed to be 43x13cm. I rounded the ends the same way as the template in the tutorial. I sewed the curved ends by machine and the long opening across the bottom by hand. I'm really happy with the result and they were quite easy to do. This batch is all ready to be donated to school for the Mother's Day stall. The kids have already put in orders for some of their own. So I promised to take them fabric shopping next weekend so they can choose their favourite designs :)

Saturday, May 1, 2010

Another card

Here is another one of the mother's day cards I've been making - "Happy Mother's Day" is printed on the inside. I actually made the cute "You're amazing" label with the help of some photoshop brushes designed by Kristina Werner that I bought at TwoPeas. I've just discovered a few scrapbooking companies (like Basic Grey and KaiserCraft) have released a lot of their traditional stamp sets and rub-ons as photoshop brushes :) It's just like having digital stamps. Obviously you can't do all the things you can with real stamps (eg embossing). But they do come in very handy and I'm sure I'll be making great use of them!

Monday, April 26, 2010

Mother's Day Card

This one of the cards I've been making for the upcoming Mother's Day stall at school. I'll post some more up when I get a chance to take pics.

Chocolate Freckle Slice

I made this slice today. The recipe is from AWW Easy Baking . Just searching for the book online now, I was surprised to find the RRP is $24.95, I paid about $8 for it at Sam's Warehouse a couple of month's ago - SCORE!!!

This recipe makes 35 sqaures - about 4x4cm each. It's only about 1cm deep, but it's VERY rich, kind of like a fudgy cookie. So one square, OK maybe two, are enough...

Chocolate Freckle Slice
185g butter, softened
220g jar chocolate hazelnut spread
1/3 cup (75g) firmly packed brown sugar
1 3/4 cups (250g) plain flour
200g packet freckles

Preheat oven to 160 deg C (140 C fan forced oven). Grease and line a 19x30cm lamington pan.
Beat butter, spread and sugar in a small bowl with an electric mixer until combined. Stir in sifted flour in two batches.
Press dough into pan, smooth surface with a spatula. Bake for 25 minutes.
Remove pan from oven and immediately press freckles firmly into slice in rows about 1.5cm apart. Cool slic in pan, cut when cold.
Makes 35 sqaures.

Crochet

**eta** 5 June 2010... When I started this new blog I was really busy, so I posted a few photos with every intention of writing about them. But it was in the middle of my first semester of uni so I had absolutely no time! So semester 1 is now over and I have a bit of breathing space - and hopefully some creative time :)

In my blog surfing travels over the past couple of years I've come across some gorgeous crochet blogs. I decided I'd love to take up crochet again. I remember making a granny square rug when I was about 8 years old, but I'd totally forgotten how to crochet - apart from chain stitch... Last year I attempted to start a granny square rug, but failed dismally. I couldn't find any tutorials on youtube, or anywhere else that didn't totally confuse me. Then... a few weeks ago I found this easy to follow tutorial on youtube . I couldn't wait to get started (even though it was mid semester) I went to Spotlight and was delighted to find some gorgeous wool in bright colours - on sale! I'm using Moda Vera 8 ply 100% wool in colours: 08 (white), 04 (pink), 34 (green), 37 (turquoise), 15 (orange). The colours in brackets aren't the real names, I'll need to find out what they are. Only the numbers are on the labels, so if you are looking for the same wool, it should be easy enough to identify.

Above is the first square I did. It took a while. But I've now sped up the process a little and it takes me about half and hour to complete one square - hoping I can get a little faster.

By the end of the first week I'd made all these (plus a couple of rejects).
If you're looking for some crochet inspiration have a look at attic24 , I came across this blog last year and it's the first one that inspired me to take up crochet again. Then I discovered Sarah London's blog and Retro Mummy These are just my faves, but there are many more. Their work is all so pretty and neat. I have a long way to go in perfecting my crochet, but I'm loving it...

Hummingbird Slice

Recipe to follow...when I find where I wrote it down. This is why I need this blog - so I don't lose my recipes lol!